

If you wish to download a
copy of WS_FTP you may do so at the following link:
http://www.ipswitch.com/Products/WS_FTP
The following instructions
are for WS_FTP:
1. Open WS_FTP by double-clicking
on the WS_FTP Pro icon on your desktop.
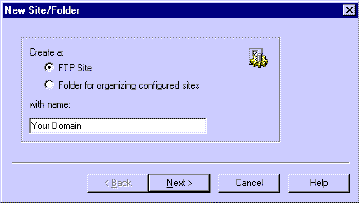
2. Enter a name for your
folder. This can be any name that you want as it will act as a "friendly"
name that identifies your profile. We will use "Your Domain" in
this example. Leave the "FTP Site" button selected and click "Next".

4. Enter the FTP server
IP address for your site. You may find this on your Welcome To hosting365.ie!
message. Click "Next".

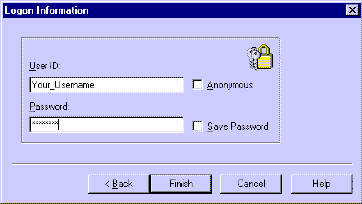
5. Uncheck the "Anonymous"
field and enter your User ID and Password in the appropriate fields.
You may find this information on your Welcome To host.ie! message
as well. If you would like the program to save your password so
that you do not have to re-enter each time you connect to your site,
check the "Save Password" box. Click "Finish".

6. You should then be returned
to the following screen with the new profile for your account under
"MySites". In our example it is named, "Your Domain".

7. To connect to your host.ie
account to begin to upload your Website files, first make
sure you are connected to the Internet . Double-click on
"Your Domain" and, if you did not choose the "Save Password" option,
it will ask for your password. Enter the password and click "OK".

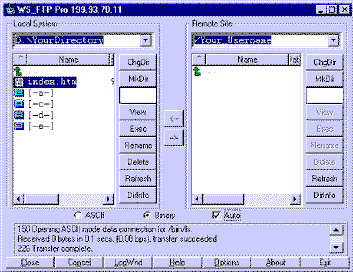
8. If the password is correct,
you will be given a screen containing your Local System in the left
field and the Remote Site in the right field. The Local System is
your local computer, and the Remote Site is your space you reserved
with host.ie. If you receive an error that you cannot login, please
double check your FTP address, username and password given on your
Welcome To hosting365.ie! message.

9. To upload files, browse
to your Website files using the Local System field. The files on
your desktop should be displayed by default, though you may browse
to your various drives (a,c,d and e) by scrolling down in this field.
In our example we have an index.htm file stored in a directory called
"YourDirectory" located in the D drive.
10. Select the files that
you would like to upload (You may select more than one file at a
time by holding down the control button when you click on the files.)
and simply click on the right arrow button. That's all there is
to it! For additional help on uploading files, please see the online
WS_FTP tutorial at the following address:
http://www.ipswitch.com/Products/WS_FTP/tutorial.html

Be sure to name the homepage
of your website, index.htm, index.html, default.htm or default.asp
and keep it directly in your website directory. If your homepage
is in a sub-folder, then it will not be displayed. Also remember
that you will need to wait until your domain name is either registered
or transferred before you will be able to see the results by typing
http://www.yourdomain.com in a browser. You will not be able to
view your site by IP address.
11. If you would like more
help with transferring files and using WS_FTP in general, please
see their extensive online help manual. Simply click on "Help" at
the bottom of the Local System and Remote Site screen. Below is
a screen shot of tips on how to upload files.

There is also an online manual
for this program and other screen shot tutorials at the following
addresses:
ftp://ftp.ipswitch.com/ipswitch/manuals/ws_ftp.pdf
http://www.ipswitch.com/support/tutorial/index.html
|

