

If you wish to download a
copy of CuteFTP, you may do so at the following link:
http://www.globalscape.com/
The following instructions
are for CuteFTP:
Step #1
This is the first screen
that will appear when you open CuteFTP. Under "FTP" select "Site
Manager".

Step #2
The site manager screen should
appear as shown below. To create a profile for your Hosting365.ie
FTP site, please click on "Add site".

Step #3
Please use the following
guidelines to add your Hosting365.ie FTP site to your CuteFTP list
of FTP sites. Once you key in the appropriate information and click
OK, you will be able to log in to your account hosted on our web
server and begin to upload files.
- Site Label - enter in a friendly name for
your website.
- Host Address - enter your assigned FTP server
IP address, an example would be ftp.hosting365.ie. You may find
this information on your Welcome To Hosting365.ie! message.
- For User ID and Password - enter your website's
username and password. You may find this information on your Welcome
To Hosting365.ie! message.
- Login type is Normal
- Transfer Type is Auto-Detect
- The remaining fields cab be left blank. Please see the online
help section for more details about these fields.
- Click OK

Step #4
You will be brought back
to the screen below - notice the name of your site is now listed
in the right hand column. Make sure you are connected to
the Internet and simply click on "Connect" to login to
your Hosting365.ie account.

Step #5
You will now be logged in
to our servers and you may upload your files.
If you receive an error that
you cannot login, please double check your FTP address, username
and password given on your Welcome To Hosting365.ie! message.
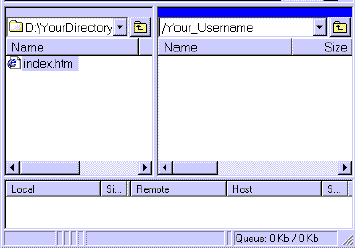
You will find your hard drive
on the left-hand side and your webspace on our servers on the right.
Simply browse to your the location of your website files. (In this
example we have an index.htm page in the a folder called "YourDirectory"
in the D drive of the computer.)
For UNIX Users
- You will see that the name of your account on your Hosting365.ie
web server is /yourdomain.com". This directory is called your home
directory . You will need to place all files you
would like to have displayed on the web in this directory.
Simply double click on this directory to gain access.

Step #6
Once logged in to your Website
directory, you may upload files either by double clicking on the
files you wish to upload in your local directory, or by dragging
and dropping the files from the left hand side of the screen to
the right hand side.
Be sure to name the homepage
of your website, index.htm, index.html, default.htm or default.asp
and keep it directly in your website directory. If your homepage
is in a sub-folder, then it will not be displayed. Also remember
that you will need to wait until your domain name is either registered
or transferred before you will be able to see the results by typing
http://www.yourdomain.com in a browser. You will not be able to
view your site by IP address.
Please see below for more
detailed instructions on how to upload files, and please note that
there is an extensive online help section in the menu of options
under "help" if you have further questions on how to use CuteFTP
and its features.
Good Luck with your website!

Pasted below are instructions
found in the help menu of the CuteFTP on how to upload files. More
extensive instructions can be found in the "Contents" section under
the "Help" menu of CuteFTP.
Transferring Files
There are numerous ways to
transfer files. If you would like further information on these processes
or any others, please see the help topics of your downloaded CuteFTP
program as they are very helpful.
Once you are connected to
a remote server there are five methods of transferring files:
Option 1:
Drag and Drop. Click to highlight the file that you want to transfer.
Using your left mouse button, grab the highlighted file, drag the
file to the opposite window, and drop the file anywhere in that
window.
Option 2:
Menu/Tool Bar. Highlight the files you want to transfer. To use
the Menu Bar, click on Commands then Upload or Download. To use
the Tool Bar, click the Upload or Download button (looks like an
arrow pointing up or down).
Option 3:
Double-click the File. Highlight the file you want to transfer and
double click. NOTE: The Double-Click Action feature must be set
to 'Transfer' for this to work. From the Menu Bar, click FTP/Settings/Options/Advanced
to see if 'Transfer' is selected in the Double-Click Action box.
Option 4:
Using Queue to Transfer. Highlight the file you want to transfer
and drag it to the Queue window. Click Queue/Transfer Queue to transfer
the file.
Option 5:
Right-click pop up menu. Highlight the file and RIGHT click then
select transfer from the pop up menu.
NOTE: If your uploaded web
pages show on the right hand side, your file transfer was completed.
You can now type in your URL or web page address in your browser
and you will see the web page corresponding to the HTML file(s)
you uploaded.
We hope this helps! Please
contact us if you have any further questions or difficulties
|

